Intended Audience
This tutorial is designed to both introduce the read/viewer to Ghost, an up and coming blogging platform, and provide sufficient detail so a novice with little experience with AWS can configure a blog, secure it, upload a theme and start blogging.
Warning. This post is not a typical DrVax post as it assumes extensive computer software experience. Most DrVax posts target people with little pre-existing technical expertice.
Prerequisite knowledge: This tutorial does assume the read has a basic understanding of Linux commands and Linux administration. Since this tutorial covers basic AWS administration it is a good basic introduction to AWS for a Linux administrator new to AWS.
This tutorial was built using Ghost 1.x however, the majority of the content is the same for Ghost 2.x. Furthermore AWS is a moving target. Amazon updates and enhanced the AWS user interface and services many times a year. While some of the keystrokes may change the concepts will remain the same.
Creating an AWS Account
Instead of using usernames and passwords to to provide access to AWS virtual machines (instances) public key cryptography is used to secure your instances. The access credentials for AWS consist of a “Key Pair” which we will use to log vis SSH into the AWS instance. SSH is a secure terminal access protocol often used to access a command line on a remote host. Here is more information about SSH from Wikipedia: https://en.wikipedia.org/wiki/Secure_Shell
A key pair consists of a public key, you can think of this as the lock, and a private key which acts like a key your might keep in your pocket. However unlike traditional keys these smart cryptography keys may be limited for use by specific entities. When AWS creates a new key pair it only displays your private key one time but it provides you the ability to save this private key to a file with an extension of PEM. You will need to have access to this PEM file anytime you want to access a server, system, service or storage area with your key.
You will find the screen for creating a keypair on the EC2 Dashboard, under the NETWORK & SECURITY section. Here is what the Key Pair screen looks like:
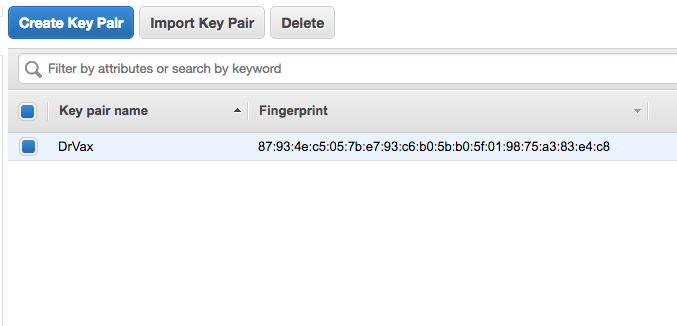
When you create a keypair, a file with an extension of PEM and the same name as you keypair will be downloaded to your computer via your browser. Do not lose this file! It has your public security key which you will need to log into the AWS instance.
Creating your AWS image (server)
Bitnami provides packaged images for use on cloud services for many applications. Here is how they described their business on their website:
Bitnami has automated the ability to package, deploy and maintain applications, lowering the barrier to adoption for anyone to deploy and maintain a full spectrum of server applications, development stacks and infrastructure applications in virtually any format.
More information about Bitnami is located at: https://bitnami.com/
For this tutorial, I used a Bitnami community Machine Image since it included a later version of Ghost than the Bitnami AWS Marketplace Image. Both are free however the initial AWS instance username may be different. Depending on the Bitnami images the initial username might be “ubuntu”, “root”, or “bitnami”.
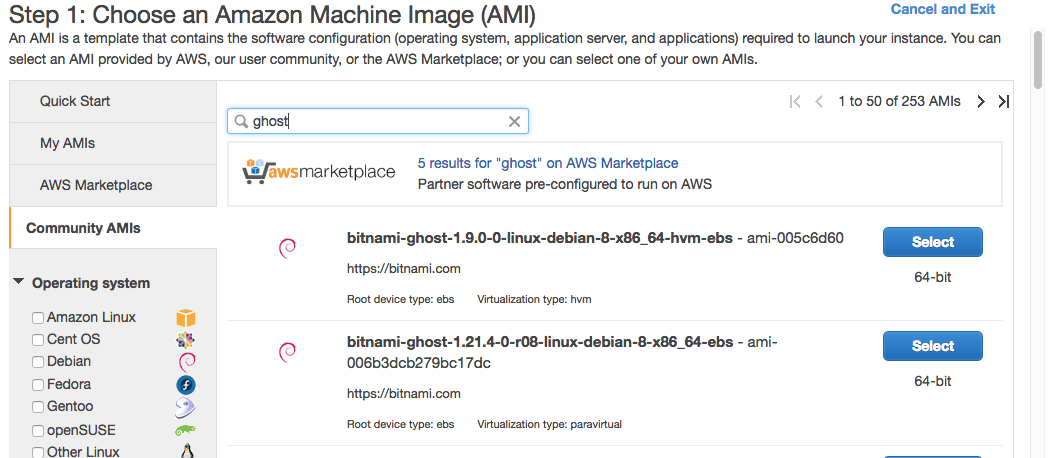
The image I selected was:

The instance (Linux) username, in this case, is “binami” and the password is supplied by the Key Pair file. In this case DrVax.pem.
From a terminal window on your PC or Mac or via an SSH application, for example Putty if you are using Windows, or the SSH command from the OS X terminal, login to the instance.
If you are using an SSH application from OS X or Linux you will need to change the protection on the PEM file. The following command can be used to do this.
sudo chmod 400 drvax.pem
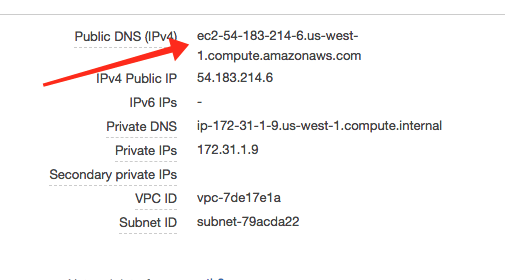
Then you need to obtain the IP address of the remote machine from the AWS EC2 dashboard.
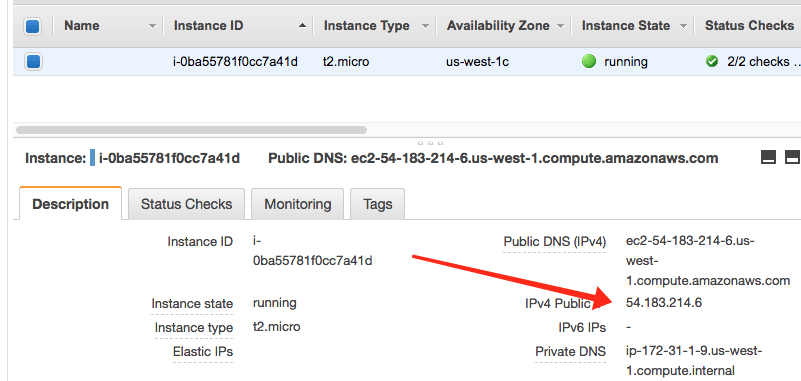
Now from a terminal session on your local machine, you can type:
ssh -i "DrVax.pem" bitnami@54.183.214.6
When you connect you will be prompted to authenticate the security answer yes. This will add the IP address you are connecting with to your local computers approved list.
A sample session, from a Mac terminal window, follows:

Now let’s make sure Apache, MySQL and Ghost are running.
sudo /opt/bitnami/ctlscript.sh status
We see Ghost is not running yet. So let's start it up with a default configuration just to make sure the basic SW is installed correctly.
sudo /opt/bitnami/ctlscript.sh restart
The output from the restart command and then another status command follow:
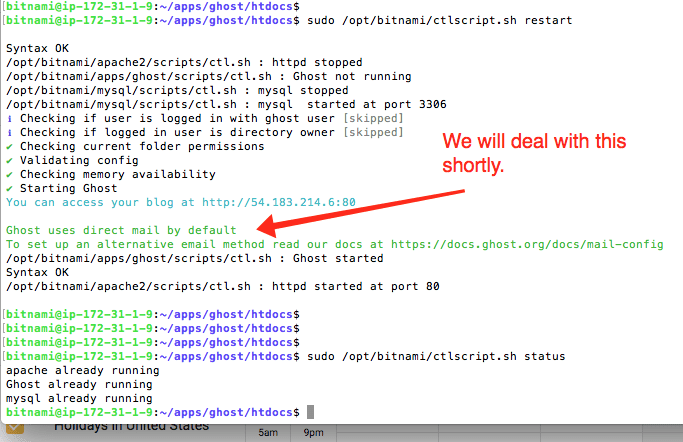
You can also check the status of your blog with a Ghost command. The Ghost CLI is installed by Bitnami by default. This is the output from the command:
ghost status

Provisioning Ghost Access Security
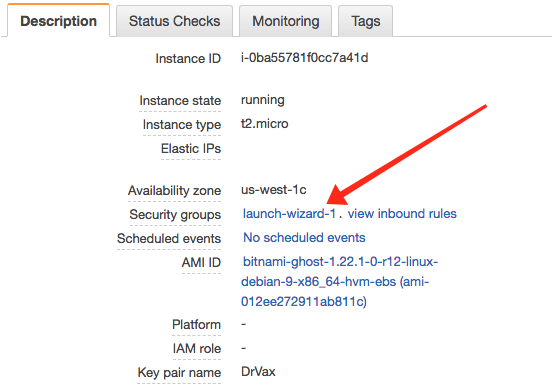
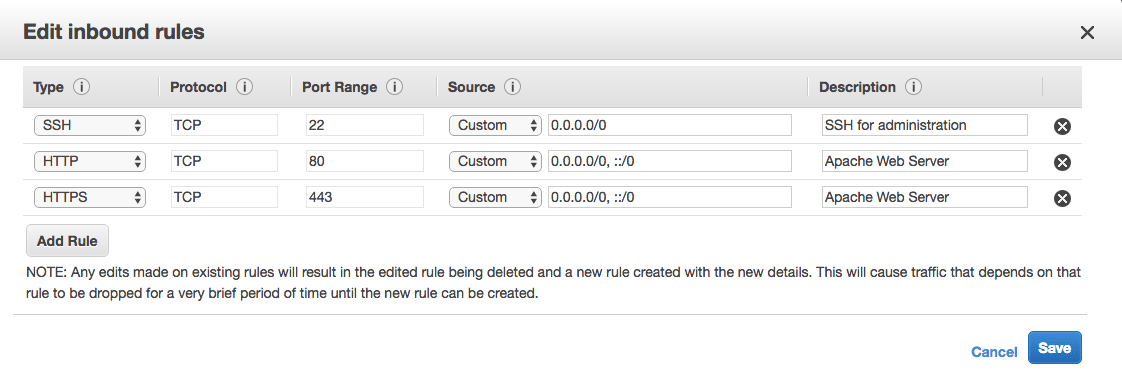
Before we can access this website/blog we need to add HTTP (browser) and HTTPS (browser secure access) to the AWS instance. We can just add these rules to the security group defined by Bitmani for the instance.
Some of the Bitmani configurations already do this for you. Some do not. To check just click on the “view inbound rules” link in the AWS console and check for HTTP and HTTPS access.
When it is correct it will look like the following:
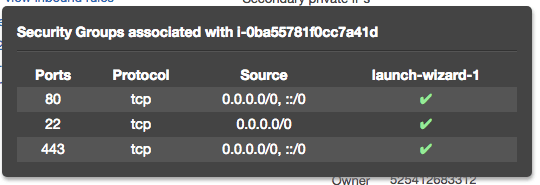
In the case of this AMI we need to use the following option to configure our access rules.
Now that Ghost is running with proper inbound access rules we should be able to go to the address listed above and see a blog with the Ghost sample stories. To do that we will need the Ghost administrators username and password. There are two ways to get this. We access a file with this information in the Bitnami home director on the server or we can look in the instance log file.
Here is are the steps to find the Ghost username / password in the instance log file. Begin by accessing the log from the instance actions:
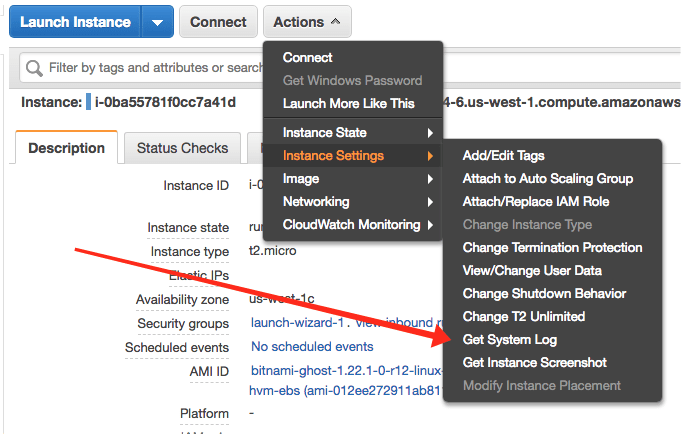
Look through the output of the system log for the following banner. This is where Bitnami provides you with the initial username and password for your Ghost instance.
[ 45.159315] bitnami[445]: ###################################################
[ 45.146729] bitnami[445]: # Setting Bitnami application password to 'XXXXXXXXXXX'
[ 45.152607] bitnami[445]: # (the default application username is 'user@example.com')
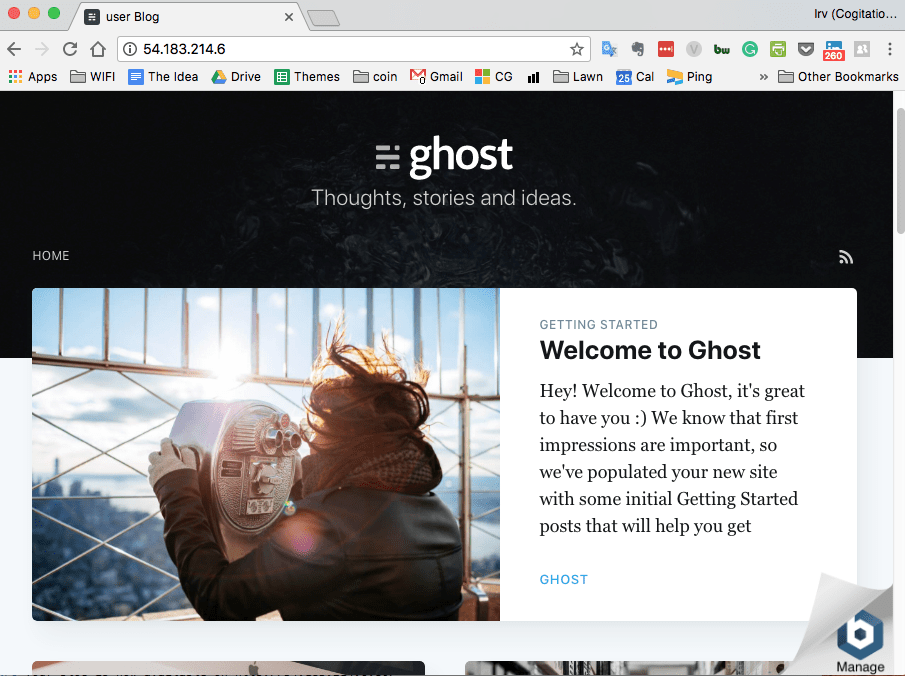
[ 45.159315] bitnami[445]: ###################################################Now use your AWS username and password to log into the new instance. To continue the setup. Point your browser at the IP address assigned to the AWS image, in our case http://54.183.214.6:80. If everything is set up correctly you should see a screen like the following:
If your browser just seems to hang check the following:
- Did you verify ghost is running with a ghost status command?
- Are you using the correct IP address http://ip-address?
- Did you verify that the security group in the EC2 instance includes access for port 80?
- Check the log produced with the command ghost log for errors.
Continue the Ghost Configuration from your Browser
Before we assign a domain name to the site, secure the site with HTTPS and add email support we will explore the Ghost administration interface a bit. Return to your site from a browser, using the Amazon assigned domain name or the instance IP address with /admin added to the end of the URL:
http://54.183.214.6:80/admin
For your username and password enter the information your retrieved for the instance log early.
As review here is a snippet of an instance access log:
[ 45.159315] bitnami[445]: ###################################################
[ 45.146729] bitnami[445]: # Setting Bitnami application password to 'XXXXXXXXXXX'
[ 45.152607] bitnami[445]: # (the default application username is 'user@example.com')
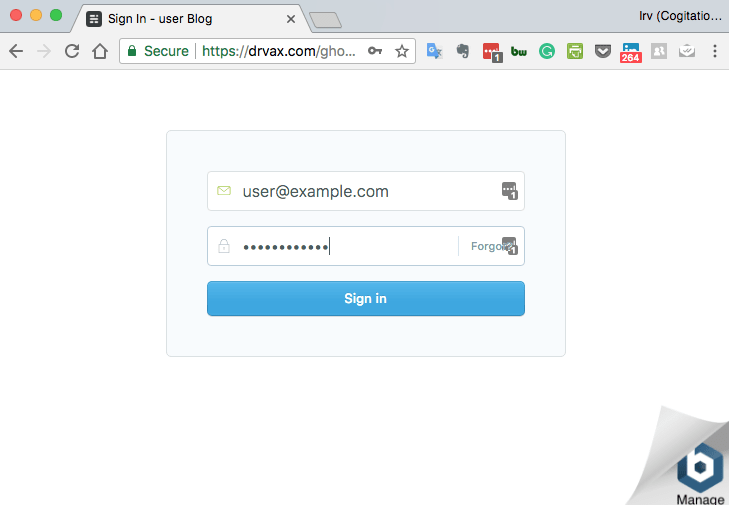
[ 45.159315] bitnami[445]: ###################################################And here is the admin login screen:
After click on "Sign In" you will be presented with the Ghost administration interface:
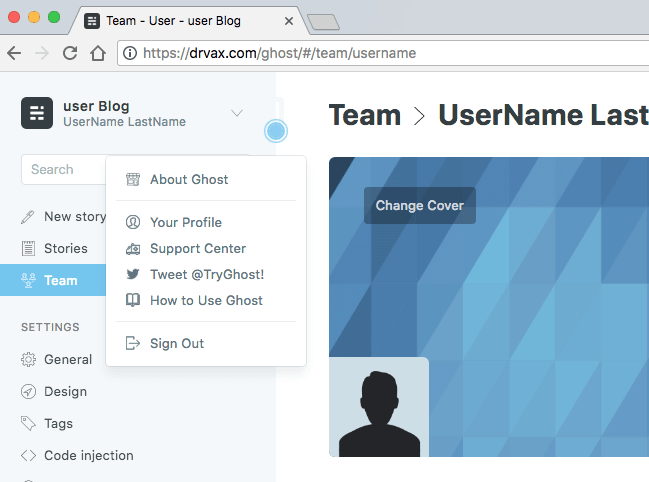
By clicking on the username in the upper left hand corner you can access the dialog to update your profile. Replace the existing information with your information. Make sure to scroll all of the way down the page and change the password for the administration account.
Feel free to play around with the content, add users under the “Team” tab and then browse to the site without the /admin to explore how content editing works. We will cover Ghost content and themes in other tutorials.
Assigning a Domain Name to our Blog
Now that we have a running Ghost instance at an IP address we need to make it accessible from a domain name. AWS assigns a temporary domain name when you create the instance. It can be found next to the IP address in the EC2 instance description. For example:
To assign our own domain name to the instance we could use a “cname” or depending on the domain service we are using we could even just forward our domain name to the name listed above. However to provide more flexibility and security we will want to hide our IP address and the AWS assigned name from our users. Why? Because if we change the instance or even stop and restart it this name will change.
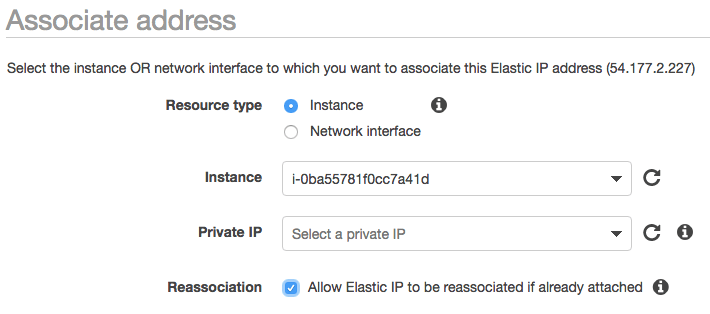
The first step in providing a permanent name is to use the AWS interface to allocate an elastic IP address to our account. Elastic IP address are permanent and remain in your account until you release them. Then we will point this Elastic IP address at our instance.

Here is an example:
Now we need to tell Ghost that we changed its address. We do this by editing a Ghost configuration file on the server. However since we just changed the IP address of our instance we need to use the new elastic IP we assign.
ssh -i "DrVax.pem" bitnami@54.177.2.227
If you previously used this elastic IP address for a different instance then you will receive the following error message since SSH wants to ensure someone isn't spoofing your IP address with another host.

To remove the old authorization issue the following command which will remove the old authorization for IP address 54.177.2.227 which is your Elastic IP address.
ssh-keygen -R "54.177.2.227"
After re-connecting via SSH you will have to re-authorize access to this IP address, since your deleted the authorization with the ssh-keygen command above. Now we can configure ghost to use the new Elastic IP address. If you tried the new Elastic IP address at this point it may seem to work. However if we do not change this in the Ghost configuration file some of our links will still point to the old IP address.
To change a Ghost configuration file you will need to either use an SFTP client to copy the file from the AWS instance to a local file, change it locally, and then copy it back, or just edit it in your SSH terminal session. Since SSH is a command line environment you need to use an editor that runs from the command line on Linux. While many “professionals” use VI or VIM and improved version of VI, I recommend to get started you use Nano which will feel much more like a traditional editors/notepad.
Ok to get started SSH into your instance and then change your directory to the following directory.
cd /opt/bitnami/apps/ghost/htdocs
Before we get started, make a copy of the configuration file in the event we mess something up.
cp config.production.json config.production.json.backup
Then type the following to open the configuration file in an editor. (We will use NANO an easy to use Linux editor however you can also us VI.)
nano config.production.json
You should find yourselves in the editor:
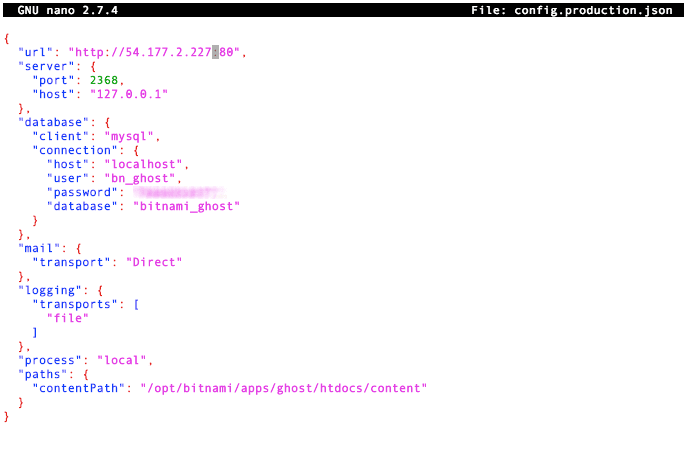
Replace the IP address listing in the following line:
"url": "http://54.177.2.227:80",with your new Elastic IP address. Once you associate a domain with this address we will go back to this file and replace the address with our domain. After your change the line type control-x to exit the editor and save the file. You can type:
cat config.production.json
to verify that file contents has change. Now let's restart Ghost and try it out from a browser.
sudo /opt/bitnami/ctlscript.sh restart
This time try click to on some of the links to verify they all point to your Elastic IP address. It’s wonderful that we have our a permanent IP address but now we need to point our domain at that address. This consists of adding an “A” record to the domain management at our domain registrar. For example here is an example at Network Solutions the domain registrar that I use:
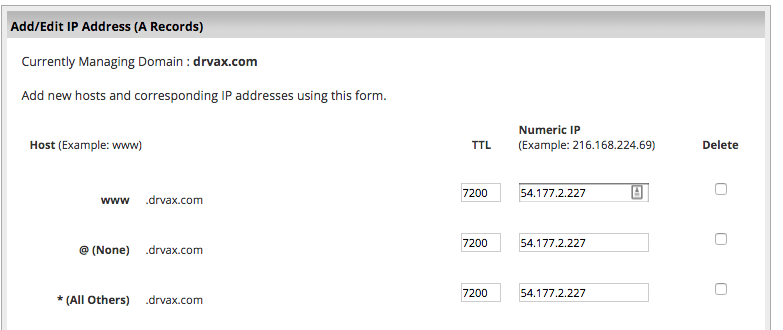
In the above example I am pointing www.drvax.com, drvax.com, and any sub-domains for example blog.drvax.com at the Elastic IP address 54.177.2.227.
It is important to note that it can take quite a long time for new domain name service information (DNS) to propagate across the internet. You will not be able to access your instance with your domain name until this has occurred.
Once your domain is pointing at your IP address we can go ahead to the next step and secure our blog by moving it from an HTTP address to an HTTPS address.
Now as a final step we need to edit the Ghost config file and check our blog address from an IP address to our new domain name. Edit the config.production.json file which is located at /opt/bitnami/apps/ghost/htdocs.
cd /opt/bitnami/apps/ghost/htdocsnano config.production.json
Now try out your new site by browsing http://drvax.com, replacing drvax.com with your domain name.
Moving our Blog to HTTPS
We will use a "Let's Encrypt" certificate to secure our web site. Once the web site is secured access to our site will be provided by HTTPS instead of HTTP. All traffic transmitted over an HTTPS link is encrypted.
You can learn more about how certificate are used to secure web site at: https://en.wikipedia.org/wiki/Certificate_authority
First we need to install the Let’s Encrypt software and its supporting components. Many utilities exist for managing your Let's Encrypt certificates. We will use the utility recommend in the Bitnami documentation.
The latest instructions for doing this are located at: https://docs.bitnami.com/aws/how-to/generate-install-lets-encrypt-ssl/
Here are the steps as documented at this time. The details of what each of these commands does are beyond the scope of this guide. So for now just cut and paste these commands into your SSH session that is at the Linux command prompt.
We will use one of the Let's Encryp clients, called "lego", to generate a security certificate needed to enable HTTPS for your site. To install "lego"you need to log in to the server console as the bitnami user.
ssh -i "DrVax.pem" bitnami@54.177.2.227
Then cut and past the following commands to install the Lego software. Please note the curl command includes all of the parts including | wget-i - which wrapped to the next line.
cd /tmp
curl -s https://api.github.com/repos/xenolf/lego/releases/latest | grep browser_download_url | grep linux_amd64 | cut -d '"' -f 4 | wget -i -
Now lets unpack the file.
tar xf lego_linux_amd64.tar.xz
Please note the file downloaded might include a version number in the name. After unpacking the file move the whole directory to you executable image directory.
sudo mv lego /usr/local/bin/lego
Please note: the executable's name, in this case lego has been different with different versions.
Finally we need to stop the web server running Ghost, specifically our Apache server. Execute the following command which to play it safe will shut down all of the Ghost components:
sudo /opt/bitnami/ctlscript.sh stop
The ctlscript is provided by Bitnami and will not exist with installations from our sources.
Use the lego command to create our security certificates and then move them into the proper locations. Make sure your replace drvax.com and the email address with your sites information.
sudo lego --domains="drvax.com" --email="drvax@cogitations.com" --path="/etc/lego" run
This is truncated image of output from an execution of lego:
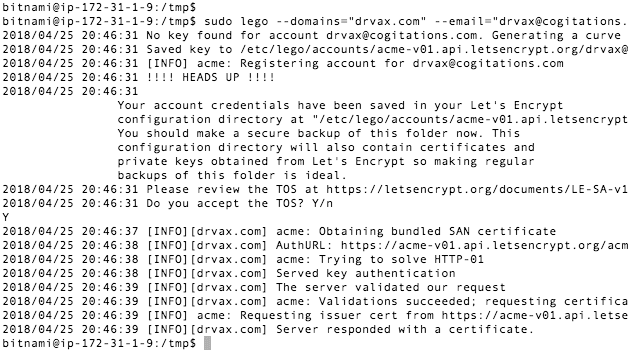
What is most important is that the last line indicates we were issued a certificate.
Before proceeding I recommend verifying that the directory /etc/lego was create and contains two subdirectories accounts and certificates.
sudo ls /etc/lego
If these files do not exist it is likely that your mistyped the /etc/lego directory name. I have made the mistake for example of excluding the leading slash.
If everything the above commands completed successfully we need to backup the old default certificates provided by Now we need to backup the old certificate files provided by Bitnami and replace them with our new certificates. Here are the commands to do that. Once again replace drvax.com with your domain name:
sudo mv /opt/bitnami/apache2/conf/server.crt /opt/bitnami/apache2/conf/server.crt.oldsudo
mv /opt/bitnami/apache2/conf/server.key /opt/bitnami/apache2/conf/server.key.oldsudo
mv /opt/bitnami/apache2/conf/server.csr /opt/bitnami/apache2/conf/server.csr.oldsudo
ln -s /etc/lego/certificates/drvax.com.key /opt/bitnami/apache2/conf/server.keysudo
ln -s /etc/lego/certificates/drvax.com.crt /opt/bitnami/apache2/conf/server.crtsudo
chown root:root /opt/bitnami/apache2/conf/server*sudo
chmod 600 /opt/bitnami/apache2/conf/server*
If everyone worked properly the above commands should not result in any error messages. If something goes wrong the above commands will leave hanging “links” which you will need to remove before your correct any typos and start over again. The command to remove a link is:
unlink mySymLinkName
After you remove any hanging links, correct the verify you entered the commands correctly and/or correct any reported errors. Once you have verified certificates have been moved into the correct location and all of the links are working properly restart Ghost and it should be available from both HTTP and HTTPS:
sudo /opt/bitnami/ctlscript.sh start
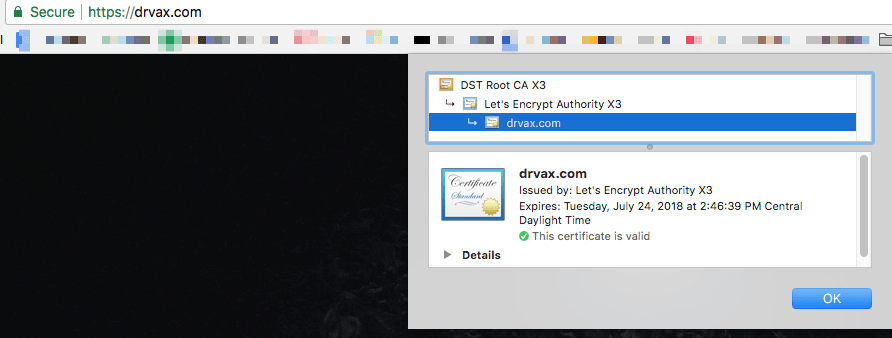
If you access site with Chrome at https://drvax.com (replaced with your site name), in the address bar you should see the word secure. Click on this word, and then click on the word “valid” under “certificate” and you should see a certificate that looks similar to this:
Now we have one more problem to solve. While https://drvax.com works, http://drvax.com also works. We want to force all users to the secured, https site. To do this we need to edit the apache configuration files.
Since the above certificate is only for the domain name drvax.com if you attempt to access your blog via the Elastic IP address or the Amazon assigned temporary domain name you will receive a security warning from your browser.
SSH into the bitnami account again and change your directory to the following:
cd /opt/bitnami/apps/ghost/conf
Now back up a couple the configuration files and then use Nano again to make some enhancements.
cp httpd-app.conf httpd-app.conf.backup
cp httpd-prefix.conf httpd-prefix.conf.backup
cp httpd-vhosts.conf httpd-vhosts.conf.backup
Using nano add the line after the comment "If https then rewrite and exit" to the httpd-prefix.conf file. Here the the content of the file after the change:
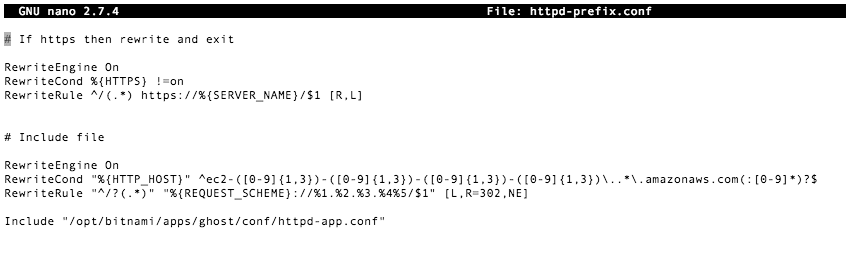
The new commands added to this configuration file are:
# If https then rewrite and exit
RewriteEngine On
RewriteCond %{HTTPS} !=on
RewriteRule ^/(.*) https://%{SERVER_NAME}/$1 [R,L]
Please note there is a space in the RewriteCond command before the !=on. If you leave this space out your will produce a syntax error.
Save the file and then we need to make a final change to the Ghost configuration. Anytime a user attempts to access drvax.com or http://drvax.com they will be redirected to https://drvax.com. However since the site is accessed via HTTPS we cannot force the Ghost application to try and use port 80. Edit the config.production.json file to remove the :80 after the domain name. This file which we have edited before is located at /opt/bitnami/apps/ghost/htdocs. This is the line you need to change in file /opt/bitnami/apps/ghost/htdocs/config.production.json
"url": "http://drvax.com:80” --- remove the :80
Then restart ghost with the following command:
sudo /opt/bitnami/ctlscript.sh restart
The way this works is that the Apache web server sends a reply back to your desktop or mobile browser that indicates the http site is unavailable and the browser should try the https site instead.
Adding AWS as an Email Server
Now that our blog is up and running, with a public domain name, utilizing HTTPS it is time to add an email server. The default Bitnami instances do not include an email configuration. As an AWS user we have access to a full feature email service optimized for the secure programmatic sending of email call SES.
The first step is to configure SES in AWS. We need to sign back into the AWS console, and select SES:
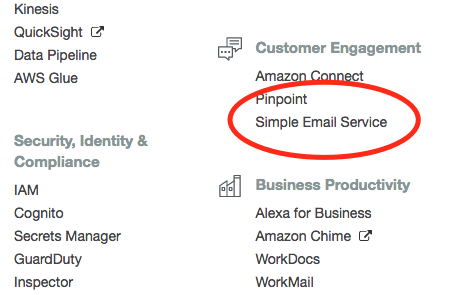
Please note that SES (simple email service) is not available in all regions. If SES is not available in the region you used for EC2 you can just select another region. Instances in one region are able to use SES in another region without difficulty.
From the SES main screen click on “Email Addresses” to configure an address that will be used to send emails. Follow the instructions on the configuration screen to verify a new address:

After verifying an SES email identity by clicking on the link emailed to the email address you entered above you need to create an SES username and password. From the SES main screen click on “SMTP Settings” under “Email Sending”. Follow the instructions to create your username and password. Make sure you click on the option to “Show User SMTP Security Credentials” and copy the displayed credentials. You will need these in the next step.

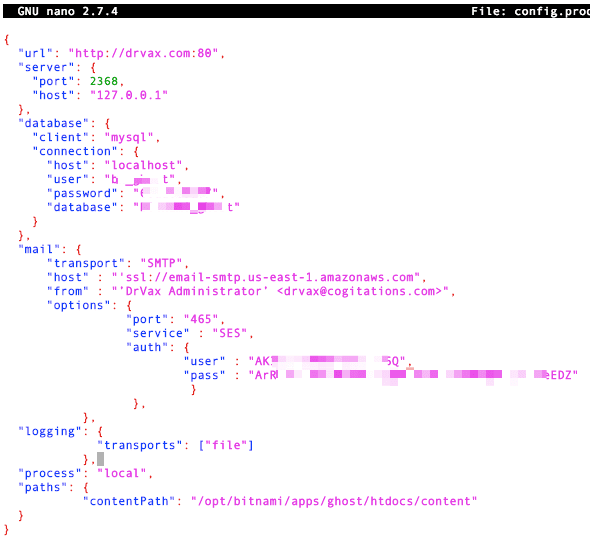
With AWS SES configured it is time to update the Ghost configuration file to use SES. We need to use SSH to navigate back to /home/bitnami/apps/ghost/htdocs and locate our config.production.json file. Them edit this file to replace:
"mail": {
"transport": "Direct"},
with the following, replacing the user, pass, and host with the information appropriate for your configuration.
"mail": {
"transport": "SMTP",
"host" : "'ssl://email-smtp.us-east-1.amazonaws.com",
"from" : "’DrVax Administrator’ <drvax@cogitations.com>",
"options": {
"port": "465",
"service" : "SES",
"auth": {
"user" : "AKIAXXXXXXXXXXXXXXX",
"pass" : "AXXXXXXXXXXXXXXXXXXXXXXXXXXXXXXX"
}
},
},
When you have completed editing this file it should contain the following:
Notes that if you are using the “nano” editor it will color code the key value pairs in the file. If your keywords are not blue and your values are not pink please check that you have quotation marks in the correct places. If you cut and pasted the mail section from this document some browser editor combinations may replace the traditional quotation marks with smart quotation marks which will break the json syntax. To correct this just delete and retype the quotation marks in your command line Linux editor. After saving the file restart Ghost:
sudo /opt/bitnami/ctlscript.sh restart
Once restarted there is an option to test your email under the “labs” section on the Ghost admin page. Give this a try and verify that email is working properly.
Added Email Capabilities to the Bitnami Instance
To email errors and logs from the Bitnami AWS instance to your email address you must configure configure an email process for the instance.
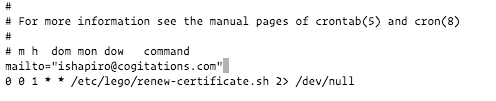
First we need to modify the Crontab scheduler which is running under the “root” account to send errors and run logs to a location we select. To do this add the line mailto to the top of the crontab file:
mailto=“drvax@cogitations.com”
Use the following command to edit the crontab for the root user.
sudo crontab -e
When you are done the file should include the following. The mailto line and the next line which we added to update our security certificate periodically.
Now we need to make email work on the Debian host created by the Bitnami installation.
First ensure our hostname is set the the domain name we defined in DNS:
sudo hostnamectl
Inspect the output. If your hostname is not reported correct use the following command to set it:
sudo hostnamectl set-hostname drvax.com
Now install the email modules on our instance.
sudo apt-get update
sudo apt-get install libsasl2-modules postfix mailutils
When prompted by the postfix install, select “internet site” and make sure the hostname is your domain name. I use have configured postfix to forward all outgoing email to gmail. We will not be configuring postfix to receive email from outside of this node instead we will continue to use gmail directly.
For this to work we need a gmail application password. This is different from you standard gmail password.
The URL to create an app password for a gmail account is:
https://security.google.com/settings/security/apppasswords
Once you have a gmail application password edit or create the /etc/postfix/sasl/sasl_passwd file and add the SMTP Host, username, and password information. The following line is required in the sasl password file:
[smtp.gmail.com]:587 username@gmail.com:password
Postfix does not read this file directly so we need to create a hash db that Postfix will use at runtime. This is the command to create the hash db:
sudo postmap /etc/postfix/sasl/sasl_passwd
If all went well, you should have a new file named sasl_passwd.db in the /etc/postfix/sasl/directory.
Now you should secure these files with the following commands:
sudo chown root:root /etc/postfix/sasl/sasl_passwd /etc/postfix/sasl/sasl_passwd.db
sudo chmod 0600 /etc/postfix/sasl/sasl_passwd /etc/postfix/sasl/sasl_passwd.db
Next modify relayhost in /etc/postfix/main.cf to match the following example:
relayhost = [smtp.gmail.com]:587
Restart Postfix with the following command:
sudo systemctl restart postfix
Check that is is running by displaying the content of the mail log file:
tail /var/log/mail.log
The content of the file should be simular to this:
Aug  3 19:18:45 cogitations postfix/postfix-script[6696]: starting the Postfix mail system
Aug  3 19:18:45 cogitations postfix/master[6698]: daemon started -- version 3.1.8, configuration /etc/postfix
Now we are ready to test our Postfix environment by sending an email:
mail -s “subject of message” emailaddress@domain.com
sample message here xyz …
^d to end the message
If everything is working correctly you should receive the email in a couple of moments. With this configuration all mail commands that use the standard Linux mail environment will send email through your gmail account.
You can look for errors by examining the mail log file:
tail /var/log/mail.log
Special Notes for Mail
If you are using a separate host for email from the host your are using as your web server it helps to make the hostname of the web server different. For example web.cogitions.com. Then also edit /etc/mailname and change all reference in the postfix config files. Otherwise emails sent from the web host to name at domain name will try and deliver to a local user.
Forwarding all root email
With you favorite text editor, edit the /etc/aliases file and add your username and external email address like so:
root: yourexternalemailaddress@gmail.com
Now run these command:
sudo postfix stop
sudo newaliases
sudo postfix restart
to test, run the following command:
echo test | mail -s "test message" root